|
|
|
|
Support > How to upload your website with Dreamweaver 8
If your site is designed and ready to upload...
If you have already designed the pages that make your site you are almost there. Follow these
steps to upload your site to the LoHost webserver.
- Go to the Site menu and choose Manage Sites...
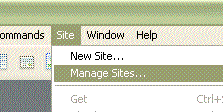
You should see the Manage Sites box.

- Make sure your site is listed and click Edit.... The site definitions window
should appear.
Go to the Advanced tab at the top and select Remote Info from the categories.

Make sure to enter the information as per the example. The password and all the details you
see in the example will be in an e-mail we will have sent you. When you have entered the above
click OK.
- You should now be back at the Manage Sites box. Click Done.
The server settings are now complete and you will not have to add them again.
Publishing your pages
You now just need to publish the files that are on your computer to the webserver. To do
so follow the next couple of steps.
- In the Files section on the right of the Dreamweaver 8 window you will see something
like this.

Make sure Site - ACME widgets.... is highlighted. It usually is by default.
- Click on the Connect to Remote Host icon. It looks like a little blue plug and socket.
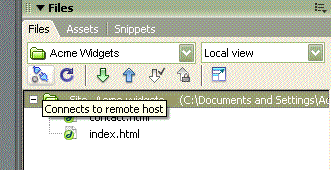
A message should briefy appear telling you your PC is connecting to the LoHost webserver that will host
the ACME widgets web site.

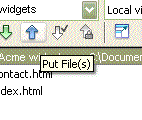
- Click the blue arrow facing up (Put Files). You will be asked if you wish to
upload your entire site. Click Yes.

Job done!
The upload will take a few moments depending on how big your website is. Once it is complete you can view it online.
If you have any problems with the above please let us know.
|
|
|
|
